Unlock iPhone Using UltraSn0w

These are instructions on how to unlock the iPhone with any GSM cellphone carrier using UltraSn0w.
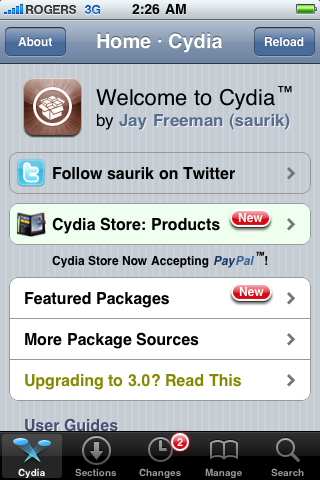

Step One
Press to launch Cydia Installer from your SpringBoard.
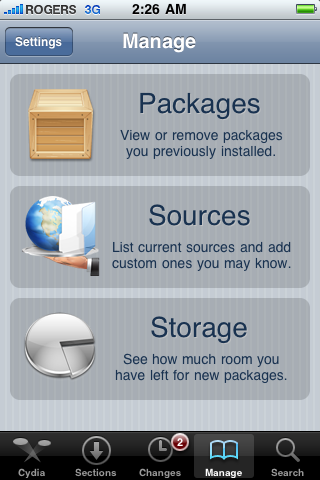

Step Two
Press to select the Manage tab at the bottom of the screen.


Step Three
Press to select the large Sources button
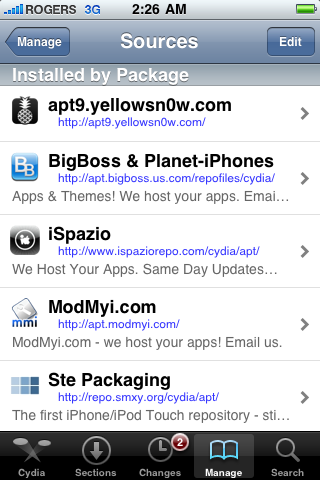

Step Four
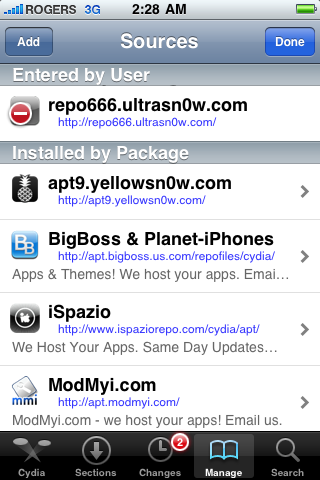
If the ultrasn0w repo is not present press the Edit button at the top right of the screen. Otherwise, skip to Step Nine.
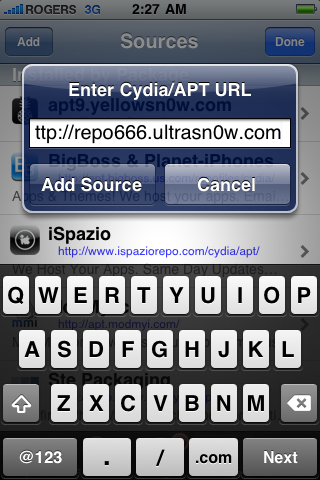

Step Five
Press the Add button at the top left of the screen.


Step Six
Enter http://repo666.ultrasn0w.com/ as the source url and press the Add Source button.


Step Seven
Once the source has been added press the large Return to Cydia button.


Step Eight
Press the Done button at the top right of the screen.
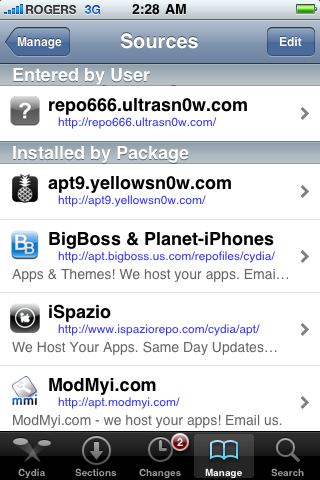

Step Nine
Press to select repo666.ultrasn0w.com from the list of user entered sources.


Step Ten
Press to select ultrasn0w from the list of packages


Step Eleven
Press the Install button at the top right of the screen.


Step Twelve
Press the Confirm button at the top right of the screen.


Step Thirteen
After installation completes successfully press the large Restart Springboard button.


Step Fourteen
You should now be able to insert the SIM of your choice!


Youtube tutorial


Source : iclarified

Jailbreak iPhone 3g 4.2.1 Redsn0w

These are instructions on how to jailbreak your iPhone 3G on the 4.2.1 firmware using RedSn0w for Windows.


Step One
Create a folder on your desktop called Pwnage

Download RedSn0w from here and place it in the Pwnage folder. Likewise, download the latest 4.2.1 firmware from below and place it in the same folder.

4.2.1 (3G): iPhone1,2_4.2.1_8C148_Restore.ipsw

Extract the redsn0w executable from the RedSn0w zip file into the same folder.


Step Two
Connect your iPhone to the computer and launch iTunes.


Select your iPhone from the list of devices on the left. Now hold down Shift and click the Restore button. Restore is preferred as it won't create any wasted space on your iPhone.


Navigate to the Pwnage folder on your desktop and select the 4.2.1 firmware ipsw. Click the Choose button to continue.


Step Three
Once iTunes has finished updating your iPhone to the desired firmware open the Pwnage folder on your desktop and launch the redsn0w application from the redsn0w folder we extracted earlier.


Step Four
Once RedSn0w opens click the Browse button


Step Five
Select the 4.2.1 firmware ipsw we placed in the Pwnage folder on our desktop then click Open.


Step Six
Once the firmware has been verified click the Next button to continue.


Step Seven
RedSn0w will now prepare the jailbreak data


Step Eight
From this window you can select the jailbreak options you would like.


Make sure Cydia is selected. And you can Enable multitasking, Enable homescreen wallpaper, and Enable battery percentage. If you do not need multitasking we would recommend deselecting it as it makes your iPhone 3G run very slow.

And check Install iPad Baseband , Click Yes when prompted to confirm your decision.


Click the Next button to continue


Step Nine
Please plug your iPhone into the computer and make sure its OFF then click the Next button


Step Ten
RedSn0w will now guide you through the steps to get into DFU mode. You can find more help with DFU mode here


Hold down both the Home button and the Power button for 10 seconds.


Release the Power button and continue holding the Home button until RedSn0w detects the device.


Step Eleven
RedSn0w will now downloaded the iPad baseband if needed and your iPhone will reboot


Step Twelve
RedSn0w will then begin uploading the new RAM Disk and Kernel.


Step Thirteen
Once this is complete you will be notified that RedSn0w is done. Click the Finish button. When your iPhone finishes rebooting (5 minutes or so) it will be jailbroken with Cydia on the SpringBoard.


Then you can unlock your iphone with ultrasn0w, tutorial
 

NOTES:
If you have problems with RedSn0w on Windows Vista or Windows 7. Right click the executable and set it to run as administrator in Windows XP compatibility mode.


Source : iclarified.com

Fix iTunes Error 1013, 1611

Several iPhone 4 users have reported that they are facing iTunes Error 1013 or 1611 while updating their iPhone 4. One Apple Discussions user provided a  possible solution for those having these error issues:

For Mac OS X:

Step 1. Go to your “Applications” folder
Step 2. Go to your “Utilities” folder
Step 3. Launch “Terminal”
Step 4. Type “sudo nano /etc/hosts” (without quotes) and hit return
Step 5. Enter your password
Step 6. Use the down arrow key to find the “gs.apple.com” entries. Once the cursor is in front, make sure you comment out the line(s) by entering “#” (no quotes) in front of the text or remove the line that has gs.apple.com entirely
Step 7. Save the file by pressing CONTROL+O on the keyboard
Step 8. Exit the nano editor by pressing CONTROL+X on the keyboard
Step 9. Restore your iDevice

For Windows

Step 1. Start –> Programs –> Accessories
Step 2. Run Notepad or WordPad
Step 3. Click “Open..” from File menu.
Step 4. Browse to Windows/System32/drivers/etc
Step 5. In “files of type:” select all documents
Step 6. Open “hosts”
Step 7. Delete all line that has “gs.apple.com”
Step 8. Hit Save
Step 9. Restore your device

Fix iTunes Error 1600, 1601, 1603, 1604

Restoring custom IPSW made with PwnageTool or Sn0wbreeze without pwning the iBoot in your iDevice results in Error 1600. If you will try to restore using recovery mode, iTunes will throw Error 21 and if you will try to restore custom IPSW using normal DFU mode, you will get Error 1600. To fix this error, you must put your iDevice into Pwned DFU Mode using iREB.

Fix iTunes Error 1600, 1601, 1603 & 1604 With iREB :

  1. Download iREB for Windows from here
  2. Connect your iDevice to your PC via USB cable.
  3. Close iTunes window if already opened.
  4. Launch iREB and click on the name of your iDevice.
  5. iREB R4 Error 1600 Fix
  6. Now use the following instructions to put your iDevice into DFU mode:
    • Hold down the Home+Power button simultaneously for 10 seconds.
    • After 10 seconds, release the Power button but keep holding the Home button until iREB detects your iDevice in DFU mode.
    • As soon as iREB will detect your iDevice in DFU mode, it will patch the iBoot using Limera1n exploit.
    Exploiting with Limera1n
  7. Once patched, iREB will confirm you that your iDevice has been put into Pwned DFU Mode.

  8. PWNED DFU ModePWNED DFU Mode


Fix iTunes Error 1600 Using Redsn0w:

  1. Launch Redsn0w and click on the Browse button. Choose stock IPSW ( not custom firmware) and wait while Redsn0w process the provided IPSW.
  2. Redsn0w as iREB in Mac
  3. Uncheck all other jailbreak options except Just enter pwned DFU mode right now
  4. Redsn0w as iREB in Mac
  5. Plug your iDevice to your PC or Mac and turn it OFF completely by pressing the Power button.
  6. Redsn0w as iREB in Mac
  7. Now put your iDevice into DFU mode using the following instructions:
    • Hold down the Power (corner) button for 3 seconds.
    • Without releasing the Power button, also hold down the Home (bottom center) button for 10 seconds.
    • Without releasing the Home button, release the Power button BUT KEEP holding the Home button for 15 seconds until Redsn0w detects your iDevice in DFU mode.
    Redsn0w as iREB in Mac
  8. Now Redsn0w will patch the iBoot of your iDevice using Geohot's Limrea1n exploit.
  9. Redsn0w as iREB in Mac
  10. Once done, click on the Finish button to close Redsn0w. Launch iTunes, hold down the ALT (Option) key and click on the Restore button. Hopefully you will not get any 16xx error including 1600, 1601, 1603 & 1604 during the restore process.
  11. Redsn0w as iREB in Mac
Source : jaxov.com

Fix iTunes Error 21

Itunes Error 21 is the most common error users face while performing the restore on the iPhone. Device Firmware Upgrade mode known as DFU mode, this mode allows you to restore your iDevice with an original iOS version or a custom iOS version.

DFU-Mode-and-Recovery-Mode (1)
To resolve the iTunes Error 21 in order to restore your iPhone/iPod touch, connect to your device into DFU mode first to get by following the instructions according to your device, The steps below will help getting into DFU mode in case you do not know how to:
  • Connect your device to your PC or Mac via a USB cable and launch iTunes.
  • Hold Home + Power button for 10 seconds.
  • After 10 seconds release the power button off, but keep the Home button pressed until iTunes a little device in recovery mode you find there.
  • Once your device into DFU mode, you see nothing on the screen, only a black image. (See above)
If you successfully performed these steps, iTunes will give you a message that a device was found in Recovery Mode and restore it. Now you SHIFT + Restore in iTunes button to press together, so that iTunes can refer to the iOS firmware to which you are restoring to. If you have followed these steps you should be able to get rid of the iTunes Error 21 while restoring your iPhone. Now you have fixed iTunes error 21, and your iPhone can be restored to an ipsw custom firmware.

Source : ihelplounge.com

How to Change iPhone Default Browser

iOS does not allow you to change the default browser, which has been one of the reasons why third-party browsers are not widely used. But if you've jailbroken your iOS device, then it is possible to change the default browser.
An aptly named jailbreak tweak called Browser Changer allows you to change your iPhone's default browser from mobile Safari to a third-party browser.
All you have to do is follow these simple steps to change your iPhone's default browser using he jailbreak tweak:
  • Launch Cydia
  • Tap on the Search tab
  • Search for Browser Changer and select Browser Changer from the search results
  • Then tap on the Install button, followed by the Confirm button
  • After the jailbreak tweak is installed, it will prompt you to Restart SpringBoard
  • Tap on the Restart SpringBoard button and wait for your iPhone to respring
  • Then launch the Settings app
  • And browse to Browser Changer and tap on it
  • Then tap on Selected Browser option under General and select the third-party browser from the list that you want to use as the default browser.
That's it, now when you open links from the Mail app, Twitter apps etc. will open the links in the third party browser that you had selected rather than mobile Safari.
You can also install the Browser Changer SBSettings toggle, so that you can enable or disable this feature to switch between mobile Safari and the third-party browser.


If your device is not Jailbroken - 
For the devices which are not jailbroken, that means if your device has a stock OS, then here is a trick developed by Jon Abram that comes in the form of a bookmarklet you can stick in Safari’s address bar and tap anytime you want to open the URL in Chrome.
  1. Open this page (yes this page you are currently reading!) in your iOS device, obviously in Safari
  2. Copy the following code
  3. javascript:location.href="googlechrome"+location.href.substring(4);
  4. Add the current page to your bookmarks by clicking arrow and ‘Add Bookmark’ in Safari
  5. Name the bookmark something like ‘Open in Chrome’ and click Save
  6. Now, go to your bookmarks by clicking the little book in the Safari browser. Click Edit and edit ‘Open in Chrome’ which is set in the previous step
  7. Delete the URL that’s there in it (obviously, it should be the URL that was added in Step 1) and paste the copied code (from Step 2) 
  8. That’s it! Now, every time when Safari your desired URL by default, just click the bookmarklet ‘Open in Chrome’ which will launch the URL in Chrome directly. Its not the exact workaround, but this tweak eliminates the pain to copy manually the desired URL every time and paste in Chrome multitasking fashion.
Source : iphonehacks.com, icosmogeek.com

How to Setup Outlook Email

Microsoft has rebranded their Hotmail and Live email services as Outlook email. outlook.com is now live and users can subscribe for their outlook.com email ID. You can easily setup outlook.com email on your iPhone and iPad and manage it right from your iPhone and iPad.


In this guide you’ll learn:
  • How to setup outlook email on iPhone, iPad Mail app
  • How to Access Outlook from Safari Browser on iPhone, iPad

Setup Outlook on iPhone or iPad from Mail app

You can get access of Outlook email address through your mail application on iPhone or iPad. You can also sync your emails and manage your outlook email directly on your iPhone or iPad Mail app. Lets set up your outlook email ID on your iPhone, ipad Mail.app
  1. Launch “Setting” app from your iPhone, iPad home screen;
  2. Now scroll down and tap on “Mail, Contacts, Calendar”;
  3. Now tap on Add Account;
  4. Select Hotmail;
  5. Enter your Outlook email address(e.g. abc@outlook.com) and password (XXXXXX);
  6. Now select what you want to sync.
set up outlook email iphone ipad 1set up outlook email iphone ipad 2set up outlook email iphone ipad 3
set up outlook email iphone ipad 4set up outlook email iphone ipad 5
You can also setup your outlook email as Exchange server. To do that:
  1. Choose “Microsoft Exchange” option instead of Hotmail;
  2. Enter your Outlook email and password and continue to start sync.
set up outlook email iphone ipad 6set up outlook email iphone ipad 7set up outlook email iphone ipad 8
That’s it. You have successfully set up your outlook email on your iPhone, iPad. You’ll get your outlook emails in your unified inbox on iPhone/iPad along with other emails from other added accounts. Setting up outlook email on your iPhone/iPad won’t let you enjoy some web specific features that make outlook email all shiny and innovative. You can follow the steps mentioned below to access your outlook email from Safari web browser on your iPhone and iPad…

Access Outlook on iPhone, iPad direct from Web

It is pretty simple as you login on other email websites.
  1. Open your Safari browser on iPhone, iPad;
  2. Write in this URL: http://www.outlook.com. if you don’t have outlook email address yet, signup for a fresh account. You can also login with your existing Hotmail or live.com email IDs.
  3. Enter your outlook email address(abc@outlook.com) and password (XXXXXXX)
  4. You can choose between mobile site or PC site/Full version at the bottom of the page.
  5. if your accessing outlook PC Site from your iPhone it may prompt you to upgrade your mobile Safari browser, just ignore it and Continue to Outlook.


Source : iphoneheat.com